When living an active lifestyle, it’s essential to listen to your body to prevent injuries. Your body needs the proper nutrients, sleep, and flexibility to endure a workout. Not having enough of these three elements will make you highly susceptible to injuries. However, there are 5 lower back stretches you need to know to prevent injuries from happening.
Benefits Of Lower Back Exercises & Stretches
The best way to prevent lower back injuries from happening is to do lower back exercises and stretches. Strength conditioning exercises will help your overall bone density and muscle growth. Flexibility stretches will allow your body to move naturally through any workout. Exercises like the child’s pose/first position, press-ups, cat-camel, bird dog, and the cat camel stretches are the 5 lower back stretches & exercises you need to know. We’ll be breaking down each position individually.
You will need the following:
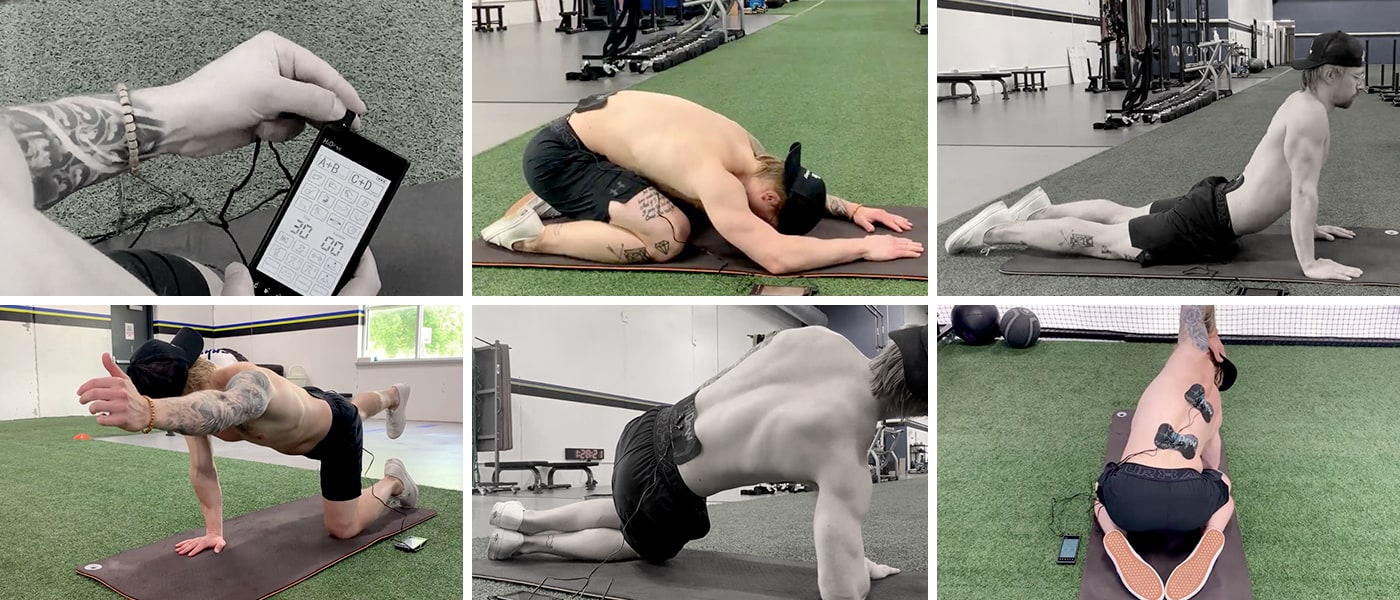
An exercise mat, a HiDow TENS/EMS device, and 5 minutes of your time.
#1 Child’s Pose/First Position
A classic and gentle stretch that has remained a classic for good reasons. It is a great position to help relieve stress, pain, and tension across your back and hips.
1. Start in a kneeling position. Keep your big toes touching, sit back onto your heels, and spread your knees about as wide as your hips.
2. Lay your torso down to the floor between your hips. Raise your arms over your head and place your inner elbows on the ground in line with the ears, keeping your elbows at about a 90° angle.
3. Keep your forehead flat against the ground and slightly draw your shoulder blades back.
4. Inhale using your diaphragm and feel the feedback of your stomach against the front of your thighs. Take 10 – 15 deep, controlled breaths, feeling the air expand into your
lower back and torso.
#2 Press-Ups
We all spend most of our days sitting with our lower backs in a flexed posture. Whether that’s sitting at a desk all day, driving a car, or just watching television. We all fall victim to flexion, which isn’t a bad thing at all! There are no “bad postures,” but being in any static/still position for an extended time could become painful. This will help pay back some of that flexion and get your lower back some much-needed extension.
1. Start by lying flat on the ground in a push-up position with your hands placed underneath your shoulders.
2. Press your entire torso up off the ground while keeping your waist and legs situated on the floor. You are essentially performing an upper-body-only push-up. Be sure your glutes and hamstring muscles remain as loose as possible.
3. Exhale at the top position, let your waist fall, and lower back dip further into extension. Lower back to the ground to reach the starting position; this is one rep. Perform 10-20 repetitions.
#3 Cat-Camel
Does your back always feel tight and stiff, especially after sitting or lying down? It could be that you need to move the joints and control those muscles in your back a little better! Here’s a great way to attack it.
1. Start on your hands and knees with the hands directly under your shoulders and knees directly under your hips. Your lower back will have a slight arch in it. Then, press the ground away with your hands, so your shoulder blades won’t sag.
2. Begin by slowly tilting your tailbone toward the ceiling; this will draw your pelvis into an anterior/forward tilt which begins extending the lower spine.
3. Next, imagine your spine is slowly being pulled to the ground, actively arching and extending your back, one vertebra at a time.
4. Imagine your sternum being pulled down to the ground as you arch further into extension when you reach your mid-back. Once you reach your neck, look up, and don’t throw your head into excessive extension. This finishes the ‘cat’ / fully extended position.
5. Now, we reverse the motion. Imagine each of your vertebrae being pulled by a string toward the ceiling one at a time. First, by tucking your chin back down, and finish by tucking your tailbone to reach the ‘camel’ /fully rounded spine position.
6. Perform this entire movement 3-5 times, working through any areas that feel stiff, sticky, shaky, or tight.
#4 Bird Dog
This bodyweight exercise will help target not only your back muscles but will also help strengthen and stabilize your core. When done regularly, Bird Dogs can help increase core stability, improve your posture, and even enhance the mobility of your limbs.
1. Start on all fours, with hands underneath shoulders and knees underneath hips. Neck in neutral position with chin tucked.
2. Slightly tuck your tailbone and draw your rib cage down, stacking your diaphragm over your pelvis. Engage your core by pushing your belly out 360° degrees around like a balloon.
3. First, make a fist and slowly raise one arm overhead while maintaining touch with the other three contact points. Next, lower that arm back down and slowly raise the opposite arm.
4. Next, extend one leg behind you, driving the heel back while maintaining the other three contact points, then return to starting position and extend the opposite leg.
5. The final advancement is raising the opposite arm and leg. While making a fist, raise the right arm forward and extend the left leg backward, then perform the opposite side. Imagine a glass of water on your lower back you don’t want to spill; this will help you remain stable.
6. Shoulders and hips should remain parallel with the ground when raising or extending throughout the exercise not to compensate and hyperextend the back.
7. Pause at the top of each repetition and perform 2-3 sets with 6-10 quality and
controlled repetitions.
#5 Side Bridge
This one is unique because it can activate the lateral musculature of the core and back. This exercise is a great choice to address weak links in stability while being gentle and safe. In addition, it will help engage important hip stabilizing muscles such as the gluteus (glute) medius.
1. Start by lying on your side with hips and knees slightly bent with your upper body supported through your elbow. Free-hand can be placed on your opposite shoulder or
simply lying by your side.
2. Imagine your rib cage is getting pulled up to the sky by a string; this will help place your spine in a more neutral position, then tuck your downside shoulder blade away from your ear.
3. Raise your hips, so that only your knee and elbow support your body.
4. Hold this position for 10 secs and gradually work up to holding longer durations (20 secs, 30 secs, 60 secs, etc.) and perform this for 2-3 sets on each side.
With that, finishes the 5 lower back stretches & exercises you need to know! Each of these exercises has excellent benefits that some can use. Be sure to do these workouts in a safe and controlled manner.
If you need help on how to do these exercises while using a HiDow TENS/EMS device, then follow our video. It goes over step-by-step how to perform the 5 lower back exercises with a TENS/EMS device.
Seeking Other Therapies For Pain Relief?
HiDow offers premium wraps and TENS/EMS devices for pain relief, along with Percussion Massage Therapy Guns. TENS/EMS devices release endorphins, the body’s natural painkillers. Percussion Therapy is universally loved and accepted as a great tool for circulation improvement, pain relief, recovery, and better sleep.
See our online store for more information about our products.
Disclaimer: The content of this blog is meant for informational and educational purposes. It does not substitute for the need for professional medical advice, diagnosis, or treatment. Suppose you are experiencing pain or increases in pain during these movements. In that case, you should seek out a qualified healthcare provider or medical professional to answer all of your questions and attain a proper evaluation and diagnosis.
Related Stories
Golf Recovery: The Body Behind the Swing
Golf recovery matters because the sport places steady demand on the body over several hours....
Jul
May: The Longevity & Everyday Wellness
May is your reset point for long-term wellness, where daily habits meet cutting-edge recovery technology....
May
Women Who Move: The Missing Manual
The Hormone–Pain Connection When estrogen is stable and high, the brain’s built-in painkiller system works...
Feb
When Courage Takes Flight: Lessons From a Women’s Skydiving Record Attempt
Photo by Taylor Buffington (T-Buff) We went to Eloy, Arizona on a mission — to...
Nov
Sciatica: 1, LeBron: 0 (For Now)
File photo: LeBron James #6 of the Los Angeles Lakers. (Photo: Thearon W. Henderson /...
Oct
Pickleball vs. Tennis: The Science of Recovery
For years, tennis was the stand-in for movement: endurance, coordination, and power all at once....
Oct